
HMRVI Corporation has been able to help lots of RV buyers since 2014 by providing quality RV inspections. Whether the RV’s have been new or used, it has not mattered, they have all had issues that were identified by Howard and Pam’s careful analysis.
When spending six to eight hours with an RV many issues can be uncovered that might otherwise be missed by a potential buyer. Even when being sold as new from an RV dealership, one can’t assume that everything has been checked out. Sometimes the RV dealerships are just too busy to be able to correct the issues they have from the manufacturer.
In this writing, Howard and Pam would like to share a recent experience with a client for an inspection on a forty-five-foot class A diesel pusher. The RV was located a fair distance from where they were but they drove to the RV’s location where it was set up in an RV park and ready to be investigated.

This was the RV as we found it. You can see our RV parked over on the right side of the picture. It is not only our full time RV home but our mobile office.
We scheduled to meet the owner of the RV before beginning the RV inspection. He was on a bit of a time schedule so we agreed to start the inspection in the late afternoon and finish it the next day so he could put the RV back in storage before he had to leave town.
The first thing Howard and Pam do is to verify the information for the RV to be sure everything is documented in regards to its VIN number, licensing, and equipment on board. This information then becomes the first section of the RV inspection report. Here is the build sheet for this particular RV: lots of things to look at and evaluate!

Once the initial investigation of the property is completed, Howard heads to the roof and Pam begins her internal investigation of the many interior components that she evaluates.
Here is what Howard saw on the roof. There are a lot of pieces of equipment on this roof and each one has sealant applied to it to keep water out of the RV. If any of the sealants fail, water intrusion can create issues for the roof structure.
This fiberglass roof could certainly benefit from some cleaning!


While looking at the front curbside corner of the awning rail trim it was observed that small cracks had started to appear in the curved fiberglass cap.


While speaking with the folks at RV Armor last year, an RV roof reconditioning company, it was discussed that even a small quarter inch hole in sealant can over time lead to a lot of internal damage to the structure of an RV’s roof, walls, and ceilings.
On the streetside rail trim, similar to the curbside issue, there were more small cracks found in the fiberglass roof cap.

Here is a picture of the sealant around one of the roof vents. All the sealant on the roof had been coated with a sealant paint that is supposed to extend the life of the original sealant. At the time of the inspection, it was faded and cracking as was some of the sealant below. Again, these are areas where if not maintained can allow water to start to degrade the roof structure.

The rear air conditioning unit had some bent cooling coil fins that could possibly affect the efficiency of the roof AC unit.

The roof mounted TV antenna was the type that is motorized. From the inside of the RV, the antenna can be raised and lowered as well as rotated by using the internal control buttons. At the time of the inspection the antenna arm was broken so it was not able to be raised.

The satellite dome located on the front portion of the roof looked like it had several encounters with tree limbs as it was scratched and also had a small crack in it. Water penetration, over time, could damage the internal workings of the unit.

The RG6 cable that transfers the signal from the satellite dish to the internal receiver was secured, but the rubber boot that protects it from corrosion had come loose and needed to be secured to prevent signal degradation.

While up on the roof Howard noticed a piece of sealant tape that had been applied by the ladder area were you step upon climbing up on the roof. Again, it had been painted over with the sealant paint. Was it covering a crack in the fiberglass roof?

Howard observed that the front windshield had two small starburst cracks: one above the streetside wiper blade and the other in front of the driver’s lower view. The owner stated they had been repaired by Safelite, but they were not optically clear as they are supposed to be for that kind of repair.

The front cap of the RV had several issues that are identified in the photo.

The entire RV had small scratches to the paint, mostly higher up due to what would appear to be tree branches that had scratched the clearcoat of the RV.
While examining the curbside sidewall Howard noticed that all the cargo door pistons were not operating as they were supposed to. Not all doors would open to their full extension and stay in that position for easy access to the storage bays. When replacement pistons can cost almost one hundred dollars, and there are six cargo doors, two each, that can add up quickly.
It is all these small items that when added up can cost a new RV owner a lot of money, after the purchase, if they don’t know about it before signing on the dotted line.

Here is a photo of some damage to the lower streetside front corner of the RV. You can also see the cracking protective paint film that was factory applied. Things like this are easy to miss in the excitement of the moment when looking at a potential RV to buy.
New RV owners get excited about all the gadgets and niceties in the RV but neglect catching the issues that can cost a lot of money to repair. It is best to have an outside third party, and an unbiased source, closely examine the RV before it is purchased!

There was some bubbling of the paint on the lower portion of the streetside rear slideout wall.

The two streetside cargo bay doors located between the slideouts made contact with each other when opening and closing them.

There was some fairly serious damage to the lower corner of the streetside rear cap.

There was also damage to the curbside corner of the rear cap.

While investigating the upper portion of the front cap of the RV, it was noticed that the rubber strip that seals the door awning at the sidewall was peeling away. At highway speeds, it is likely this piece of rubber would continue to peel away from its intended position.

While investigating the condition of the slideouts several things were noticed. First, there was a corner where the slideout rood blade seal and the side blade seal were not making proper contact at the corner where the slideout roof and slideout sidewall meet. This could create a water intrusion issue. Over time that could degrade the integrity of the sidewall surrounding the slideout.

The slideout side blade seals were showing signs of cracks and dryness. This decreases their ability to do the job of keeping water out of the RV.

Some of the blade seals were not sweeping out as they were supposed to. Again this could create a water intrusion issue.

While continuing to investigate the RV’s three slideouts, Howard observed that a trim piece appeared to be missing at a lower corner of the streetside front slideout where the sidewall meets the slideout flooring. A bit earlier in the inspection, a bent piece of metal was discovered in the curbside storage bay.

He went and retrieved that piece, and sure enough, it looked like what belonged there. The way it was bent would indicate that it may have gotten hung up in the slideout mechanism when retracting the slideout.

When the inspection turned towards the tire assemblies and the chassis, the inspector observed that on both the front tire assemblies, around the center hubcap, that oil was streaking out as it would do while the tires were in motion and there was oil inside the cap. The oil bath bearings may have a leaking seal that would cause this issue.

While investigating the underside of the RV chassis from the perimeter, and all the way around the RV, Howard looked for areas of scraping damage, tire damage, significant rust, oil leaks, and other things that just don’t look right.

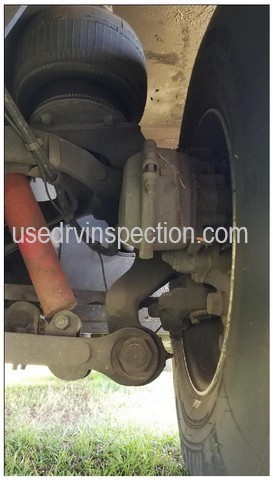
The front wheel assembly and airbag.
While looking at the curbside rear tag axle wheel assembly it was noticed that the mud flap had been torn up. The owner later admitted that he had a tire blow out that created the issue and also did some damage to some of the chassis wiring in that area. One of the things affected was the ABS brake sensor for that tire assembly.
The owner also stated that at that time he put all new tires on. This was a little less than a year ago from the inspection date. That would mean the date of birth codes on the tires should agree. When the inspector went looking for those he found that the tires were over two years old. The tire dealership had sold him tires that were already over a year old.

At this point in the inspection it was time to evaluate the engine compartment, which was dirty, and all the fluids for the motorized components of the RV: the engine oil, the engine coolant, the transmission oil, the hydraulic oil, the generator oil, the generator coolant, and the coolant in the hydronic heating system.

Here are the results from the samples that were sent to the lab. Of the seven samples that were taken, three revealed abnormal to critical results. That is actually a lower percentage than Howard normally sees from these kinds of inspections. Usually, two out of three are in the abnormal to critical range.


While investigating the condition of the radiator and the cooling fan assembly, and motor, Howard saw hydraulic fluid leaking from the connections to the hydraulic fan motor.

Once the chassis and motorized component investigation had been completed Howard started on the electrical systems. The 120-volt electrical panel cover is removed and the breakers and all wiring are checked for a previous excessive load. The 12-volt system is also checked. In this picture, a 12-volt fuse was checked for continuity and found to be bad.

Another part of the electrical inspection is to test the generator under load. In this case, the 12.5kw generator was tested with about 6kw of load and the photo below shows the results. The photo shows the generator was producing 116 volts at a frequency of 60 hertz, which it is what it is supposed to be.

Once the electrical evaluation was complete the water systems were next. When water was hooked up to the RV via the onboard water hose reel, water was found to be dripping from it and landing in the storage bay it was located in.

One of the really important aspects of an RV inspection is to evaluate the safety systems of the RV: the LP detector, the carbon monoxide detector, the smoke detector, the fire extinguisher, checking for leaks in the propane system, emergency exit functionality, and electrical safety. In this case, all the detectors were original equipment and a replacement was recommended as they were not functioning.


While Howard is investigating the exterior of the RV and performing systems tests, Pam is inside evaluating a long list of items that are part of an NRVIA’s standards of practice. Now, this is just a small thing, but having ice forming around a door seal means this item should be checked to improve refrigerator efficiency. Small things all add up to bigger problems!

This photo shows that the cooktop burners are not allowing gas to flow evenly in order to create a consistent flame. Again, a small issue bit an indication of a lack of maintenance in the RV!

Most RV’s have simple air conditioning systems where the roof units (some have basement air) pull warm air in through filter units, pass it over cooling coils, and push the air back into the RV. If either the cooling unit is losing efficiency, or the airflow is restricted, the AC unit will not work as well as it should. In other words, the degrees of difference between the warm air going in and the cool air coming back into the RV will not be as much as it could be.
The AC units are tested during the RV inspection process. What do you think about this AC unit’s filter assembly? I asked the owner of the RV, in a roundabout way, when he had last cleaned the filters. He responded he did not even know where they were. They were hidden behind removable ceiling panels that he had no idea existed. So, they had not been cleaned for two years.

The rear AC unit in the bedroom area had apparently been discovered at one time because the filter assembly had been duct taped closed. Instead of replacing the filter housing with a new part this method was employed.

The closing portion of the RV inspection process is to evaluate all interior items for functionality and appearance. Things like the following pictures are observed. Now, this may seem obvious but it is amazing when a prospective buyer is checking out the RV, that they miss issues like this. Again, a perceived small issue, but what does one of these little RV light fixtures cost?
Given the age of the RV and that exact replacement may not be available, a similar type of light fixture at Amazon could run between twenty-five and fifty dollars.

The wall panel above the entry door had some wrinkling of the vinyl material. A small water intrusion or moisture issue? The RV inspector does not know the cause, it is just their job to point things out and recommend that the issue is evaluated by a qualified RV technician.

This photo shows the vinyl wall material separating by the entry door and by the front passenger’s seat.

Inside a cabinet, it was observed that some water staining had occurred at some point. Again, the inspector does not know the source or when it occurred, just that it did and it is noteworthy to point out. These are the things an RV inspector has to dig deep to find, but it is what they do.

Is a cabinet door that is out of alignment, due to loose hinges, a big deal? Well, when you are spending hundreds of thousands of dollars for a home on wheels, Howard and Pam think it is!

Here is a photo of the interior by the upper right corner of the windshield. Something is going on here and was noteworthy to point out.

I have shown you fifty photos of issues that were uncovered during the RV inspection process. There were one hundred in the actual RV inspection report, and six videos as well. This was a higher level inspection that was ordered by our client, including the fluid analysis. The inspection took eight hours and yielded a ninety-five-page report.
Some RV inspection reports are shorter, some are longer. It depends on the number of issues uncovered during the investigation process.
For those of you that have had a home inspection done on a house you were buying or selling, how long did that inspection take? Two to three hours, perhaps? That is generally what I hear.
So, imagine now that a less than four hundred square foot home on wheels takes four to eight hours to inspect, depending on the type of RV and the level of inspection chosen. Is this a thorough examination? You bet it is!
If you would like to tackle a full-blown RV inspection on your own, check out my discussion at this link. If you are a do-it-yourself kind of person, you may have the skills to save time and money by following my advice! I have trained over 1,300 people to be RV inspectors since 2010.
Know This Before You Hire an NRVIA Inspector!
Before choosing an NRVIA inspector, be sure to interview them to discover their RV industry experience. I would suggest you search for an inspector with these qualifications:
- They themselves are an RVer with several years of experience living and traveling in an RV.
- For best results, two years of experience as an RV inspector or proof of knowledge base.
- For best results, twenty-five premium RV inspections are under their belt.
- For motor homes, delve deeply into their experience with them. Motor homes are much more complicated than towable RVs and require a higher level of experience inspecting them.
- Ask for a sample report for the class of RV that you are looking at.
Please leave me a comment before you go! I would be happy to respond to your inquiry!
Wishing you many blessings as you enjoy your future RV lifestyle!
Howard and Pam


2 comments
I am interested in getting a 2-axle Class A gas motor home inspected. Please let me know what you would charge and if you are available Tuesday. The RV is in Oviedo. Thank you!
Author
Hi Robert!
Thanks for stopping by our website!
I did respond to you via the email address you left here.