
The proper application of RV roof sealant and the maintenance of it should be on the top of any RV owner’s maintenance list! If the RV roof sealant starts to crack and degrade, this will become a major source of problems inside the RV!
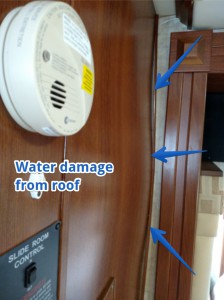
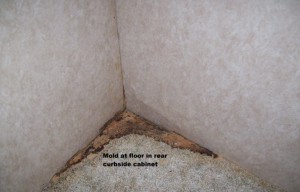
The damage will start off slowly and one will never know that it is occurring until one day when stains are noticed on the interior of the RV, or perhaps even more serious, an area of delamination is noticed on the exterior sidewall of the RV! Water making its way into the inside an RV’s sidewalls can really create problems with rotting and mold growth. Once that starts it is nearly impossible to reverse the damage!
RV Roof Sealant
So what can you do about this? Is there any easy way to assure that your RV is protected from the elements?
The best thing to do is to regularly check the RV roof as well as the interior of the RV. Just climbing up on the roof and looking at the sealant joints may not always reveal a problem. The sealant may look fine but be starting to separate in an area that you can’t really see. So, I also recommend looking inside in areas that are not regularly inspected: in cabinets close to wall and ceiling joints, behind drawers in corners of the RV, and even behind vent areas close to the floor!
Pam and I were doing an RV inspection of an older class A RV, and we removed a panel below the refrigerator and found mushrooms and mold spores growing. Our first indication was a slight bubble of delamination on the outside sidewall and a separation of the curbside awning rail trim. I did not catch it while on the roof but all three pieces of evidence completed the story and the need for a roof repair.
A good time to survey the interior of your RV is after a heavy rain! Wet areas and pooling water in interior areas will be readily apparent after a rainstorm that you may not have otherwise noticed!
When on the roof of your RV it is a good idea to get on your hands and knees, with knee pads on so you don’t create pressure points, and get a feel of what the roof is like. As you are crawling around you will be closer to the roof and better able to spot issues. You will also be able to push on areas that appear different than the surrounding areas.
Soft spots that you notice could be from loose roofing material and damage to the roof materials below the surface. You also want to look for dips or ripples that appear on the roof surface. These could be from improper roof maintenance or from a sealant failure that has now started to deteriorate the roofs substrate.
With rubber roofs, referred to as EPDM, these areas of unevenness can possibly be from using cleaning products on the roof that contain petroleum distillates. These will cause the rubber material to swell and loose its ability to stick to the roof substrate below. Over time, that just makes the roof more vulnerable to further damage.
Damaged RV Roof Sealant
So, now that you have been up on the roof, and identified possible areas from your inside inspection, you can take a closer look at the sealant surrounding roof edges, vents, skylights, and other roof penetrations. Look closely to see if it is brittle, cracked, or even loose and pulling away from the roof material. Don’t be afraid to poke around! You must be sure the sealant is pliable with minimal cracking.
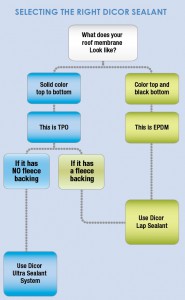
Okay, so what kind of sealant should you use to make the needed repairs you have identified? This can be a little tricky because you do have to know what kind of RV roof material you have! Depending on what sealant type was used you will have to find out what the manufacturer of it recommends for the application!
If the manufacturer of your RV did not make recommendations in your owner’s packet, you will have to investigate the roof material type and then seek out recommendations from their website. For example, if you find out the Dicor Corporation made the EPDM rubber roof material, you can visit their website and seek out recommended sealant types.
If the sealant around your plumbing vents, skylights, vents and roof edges is cracked, brittle or has peeling edges it is time for you to take action! Again, I can’t stress this enough! Keeping a watchful eye on the roof of your RV is so important for the proper care of your RV! You must prevent water intrusion from occurring!
If maintained regularly, it will not be such a big project and repairs will be simple. If the affected area just needs some cleaning and removal of loose material, the repair time will be minimal. If the sealant is beyond that stage, then more work will be required. Removing the old sealant before applying a new coat can be time-consuming. You want to be sure to use the right tool so you don’t damage the roof material!
In most cases, Dicor lap sealant will be the appropriate material to use to repair an RV rubber roof. There will be cases for those that have one-piece fiberglass roofs that a silicone sealant will have to be used. This will be the joint areas where the fiberglass roof joins with a front cap, rear cap, or even a sidewall rail trim.
If you are unsure about just what product to use on your roof, be sure to contact your RV manufacturer and get their advice! A wrong choice can be even worse than no roof maintenance at all!
Happy RV Roof Sealant maintenance!


12 comments
Skip to comment form
Inspections are one of the key steps for RV roof maintenance. It is essential to inspect the RV roof regularly for any signs of damage, such as cracks, tears, or loose seams and if any RV owner neglects it then minors problems can become major ones jeopardizing the scenario. During inspection if someone notice damage areas on the RV roof then it can easily be repaired.
Author
We routinely check our RV roof once every month. The more we move it the more it needs to be checked for possible damage.
Dicor was used to seal the rear roof where it meets the back of the camper. I have a 1 piece roof but the factory sealant started peeling up. I removed the old sealant completely, cleaned it with hot soapy water, and let it dry. I was able to lay down a large bead across the width of the roof which was actually turned out to about a 1″ wide bead once the sealant settled. There was enough left over to repair a couple of cracks in other locations as well.
when your are choosing a product for repairing leaks make sure you find that is specifically designed for RVs and mobile homes and compatible with your RV roof surface. Liquid RV roof is the best sealant on the market which can help with a variety of issues that could be troubling your vehicle
Author
Thanks for the opinion Jennfier! My opinion is that Dicor Lap Sealant is the best sealant on the market to apply to RV roofs.
The benefits of using an RV roof sealant are undeniable and a major reason why the RV owner needs to ensure their roof is sealed properly. Getting a high-quality sealant is the best way to get the results needed to seal a leaky roof.
That’s good to know that you must determine what sealant is already on your RV roof so it’ll work when you replace it. We found a small leak in our trailer roof so we’re trying to figure out how to repair it. We’ll have to see if we can find a business that could help us determine what the sealant is and repair it for us so we’ll know it’s done correctly since neither one of us actually know how it works.
Author
Thanks for stopping by our website Hazel!
A lot of RV manufacturers will state in the owners manual about the type of sealant that is recommended to use when repairing/replacing it. If that information is not present in your owner’s packet, you could contact the manufacturer to get their recommendations. That way when you seek someone out to repair the sealant for you the right type will be applied.
What about those of us with older Class C rigs that have aluminum roofs? What product should we use and should we check the sealant more often?
Author
Hi Frederic!
Thanks for stopping by our website!
I had an older Newmar RV that had the Dicor Britek aluminum roof. On that, the recommendation was to use a self-leveling lap sealant to seal around all the roof penetrations. Dicor is one company that does make that product. There are others, but I stick with that.
I would be checking your roof sealant at least every three months. That seems to be what the RV manufacturers recommend as well. I check mine monthly because we are fulltimers and we move the RV around a lot. I don’t think it hurts to check more frequently.
Good Post! Yes This is very necessary to choose the right product for your RV roof. Choose the long lasting cost effective and reliable EPDM Liquid Roof.
Author
Thanks for stopping by Lillian!
Yes, agreed! When deciding to update the rubber roof surface, the correct product choice is essential. Even though it is pricey, I am seeing the move towards products like RV Armor. Once applied this 56mm thick product will eliminate the need for future sealant applications and it is warrantied for the life of the RV.