Pam and I have been operating our RV inspection company HMRVI Corporation, Howard’s Mobile RV Information Corporation, since early 2014. We have accumulated some RV inspection stories over the past years as we have been out helping folks with their RV purchases.
Whether the RV has been new or used or the clients have been experienced RVers or not, we have been able to provide lots of valuable information to help our clients decide whether or not the RV they were looking to purchase was the right one for them.
When we do an RV inspection for a client it takes us four to eight hours to complete the analysis. What we do is the equivalent of a home inspection, but for an RV. And from what I understand, our analysis on a few hundred square feet is way more involved than what the home inspectors do on thousands of square feet.
Why is that? Well, an RV has some complicated systems. There are many things to look at, test, and evaluate. The average RV inspection has hundreds of items that we evaluate.
What Does an RV Inspection Entail?
The RV inspection report will consist of photos and sections describing the items that have been identified during the detailed analysis of the following systems:
Roof
- Inspect and rate the overall roof condition
- Evaluate the condition of the various sealant and joints around the roofing components
- Rate the condition of the roof vents, air conditioners, antenna and other components that are mounted on the roof
Sidewall and End Caps
- Inspect and evaluate the appearance and functional condition of the end caps, sidewalls, entrance doors, windows, and cargo access doors
- Inspect and evaluate any damage, discoloration, and delamination of the sidewall and end cap components
Slideout Rooms
- Inspect and rate the roof condition
- Inspect and evaluate the condition of the seals, sweeps, and gaskets for possible damage
- Evaluate the attached wiring and utility harness that feed underneath the slideout room
Awnings and Slideout Toppers
- Operate and rate condition of the awning frames and latching mechanisms
- Evaluate and rate the condition of fabric material of the awnings
Chassis Turn Signal and Running Lights (12 volt DC)
- Activate and evaluate the operation of the DOT lights
- Visually inspect the chassis battery compartment, the electrical connections, and batteries
120 Volt AC Electrical System (house type power)
- Inspect and rate the condition of the power cord and its connection ends
- Remove cover panel of the 120-volt circuit breaker box to visually inspect the condition of the wiring, circuit breakers and grounding connections
- Test and verify the output operation of the 120 VAC to 12 VDC converter for charging of the deep cycle batteries
Generator- Engine – if installed *strongly recommend performing oil analysis to determine internal combustion engine component condition.
- Identify and note the model, serial number and run hours of the generator
- Check oil level
- Start, operate and test the onboard generator
Generator – Radiator – if installed on this model of Generator *strongly recommend performing coolant analysis to determine the condition of the coolant fluid and the internal cooling system.
- Visually inspect the coolant reservoir, radiator, and hoses
Inverter – if installed
- Identify and note the model and serial number of the inverter
- Visually inspect the wiring and electrical connections and fuses/circuit breakers
Coach Battery System – (12 volt DC deep cycle Battery Electrical System)
- Locate and note the location of the battery stack
- Evaluate the condition, age and matched sizing of the battery stack
- Access and visually inspect the wiring, fuse panel and fuses of the 12 volts DC electrical system
- Evaluate the operation of the freshwater /wastewater monitor panel for incorrect tank readings
Fresh Water System
- Verify the fresh water connections for the city water hookup are operational
- Verify the onboard fresh water tank and pressure pump system will operate and maintain pressure
- Operationally test all freshwater fixtures inside and outside of the RV
Waste Water Systems – (Gray and Black Water)
- Operationally test and inspect both waste (gray and black) plumbing systems for leaks under the sinks, shower, around the toilet and discharge lines
- Operate both drain valves and test for ease of operation
- Verify the drain cap is in place and will hold wastewater
Life Safety Items
- Perform and document LP gas timed leak test at cooktop burner spud for 5 minutes at 8 inches of water column gas pressure
- Test the Ground Fault Circuit Interrupter (GFCI) circuits in the 6-foot range of the water areas of the bathroom, kitchen, and exterior receptacles
- Test all wall receptacles for correct polarity and ground fault
- Test the exterior skin for hot skin that would cause electrical shock
- Emergency Exit Windows – Verify all safety windows are operational
- Fire Extinguisher – Verify unit is secure in bracket and dial indicates extinguisher is fully charged
- Smoke/Fire Detector -Test and verify operation of unit and document expiration date of detector
- Carbon Monoxide Detector (if applicable) – Test and verify operation of unit and document expiration date of detector
- LP Gas Detector – Verify gas detection and audio alarm and document expiration date of detector
- Verify the rubber grommet is properly sealed around LP gas line of water heater – if equipped
LP Gas System
- Visually inspect all hoses and pressure regulators for damage and age deterioration
- Verify the plastic cover has been installed over the regulator
ASME tank – if equipped
- Conduct a visual inspection of tank for rust or physical damage if tank is accessible
- Document the manufacture date of the ASME tank if accessible
- List the gallon capacity of the tank
Refrigerator
- Identify the brand, model, and type of refrigerator
- Operate on all heat sources – 120 volt AC, LP gas and for 3-way refrigerators, 12 volt DC
- Collect serial and model number and verify with manufacturer if recall notice has been issued and completed for this unit
- Test for interior temperature of upper and lower refrigerator compartments and ice maker (if installed) *if refrigerator has been operating for minimum of 12 hours
Water Heater – if equipped
- Identify the brand, model, and type of water heater
- Visually inspect burner assembly and gas exhaust system for blockages and insect infestation
- Fill tank with water (if necessary) and verify operation on all heat sources – LP gas and 120 volt AC if equipped with heating element
Furnace – if equipped
- If accessible, identify the brand, model, and type of furnace(s) that have been installed
- Visually inspect air intake and exhaust assemblies for blockages and insect infestation
- Operate and verify warm air discharge out of vents and proper return air flow to unit
Cooktop/ Stove
- Evaluate and rate the condition of the cooktop or stove
- Verify the ignition and operation of all top burners and the oven flame (if equipped)
- Inspect and rate the condition of the metal grill top and rubber grommets of top burner area
Air Conditioner(s)
- Identify and list the type of cooling unit/heat pump
- Perform cooling efficiency test (Delta T) on each unit
Washer/ Dryer
- Visually inspect and verify a wash and rinse cycle of the washer and dryer
- Evaluate and rate the exterior condition of the dryer exhaust vent
Microwave/Convection Oven
- Identify and list the brand, model, type and output wattage of the unit
- Operate unit for 60 seconds utilizing cup of water and then list water temperature
Dishwasher – if installed
- Identify and list the brand and model of unit
- Verify operation of unit and inspect for leaks and non- functioning rotating racks and wash bars
In-House Vacuum System – if installed
- Identify and list the brand and model of unit
- Verify the operation and visually inspect the various components of the hose assembly, access doors, and dirtbag
Electric Fireplace – if installed
- Identify and list the brand and model of unit
- Operate and verify the various heat settings, fan speed levels, and the backlighting
Cooktop Exhaust Fan
- Operate and verify condition of the exhaust function and fan speeds
- Evaluate and rate the exterior condition of the exhaust vent
Ceiling Mounted Fans and Ceiling Exhaust Vents
- Visually inspect the condition of the blades and motor
- Operate and verify condition of the blade direction and fan speeds
Interior Conditions and Appearance
- Visually inspect all ceilings, walls, interior doors and flooring for signs of water intrusion, surface damage and/or staining
- Operate all windows and doors noting any deficiencies or missing components
- Operate all interior, exterior and decor lighting – 12 volt and 120 volt
Cabinets and Closet Condition
- Inspect and evaluate all cabinet doors, drawers and pull out operation
- Visually inspect all counter tops and flat surface areas of the kitchen, living room, bathroom, bedroom and storage areas for scratches and damage
Furniture
- Visually inspect the condition of the dinette table/booth, chairs, recliners and sofa
- Inspect and note furniture fabric tears, discoloration and signs of excessive wear
- Visually inspect and note signs of mattress damage or staining
Entertainment System
- Visually inspect and operate all TV and stereo equipment
- Verify DVD/disc players and radios are operational
- Raise and lower roof mounted antenna if equipped
Shower/Tub Enclosure
- Visually inspect the glass panels, curtains and soap dish areas
- Evaluate and rate the seals around the framework and doors for water leaks
- Operate the door and latch system to verify its operation
Motor Home – Please note the following items: Due to insurance restrictions the Motor Home can NOT be driven by the Inspector. Also, the lack of clearance under the motorhome and safety issues the Inspector will conduct the chassis inspections from the outer perimeter of the motorhome.
A pretty comprehensive list, right? And this is an example of a mid-range motorhome inspection.
If you want to tackle this on your own, you can check out this discussion that is also on our website.
RV Inspection Stories
So, from that comprehensive list above, how does that translate into useful information for the person looking to purchase a new or used RV? Let me share with you some examples of what occurred in the RV inspection process to give you a better idea of how this kind of information may be able to assist you.
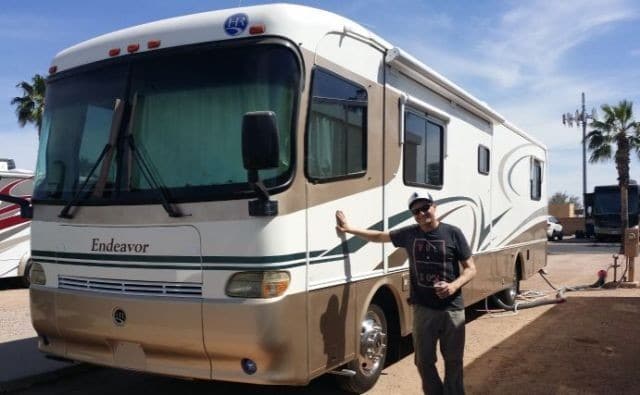
This is one of our clients who contacted us to help him with his first RV purchase. He found an eighteen-year-old RV with almost fifty-six thousand miles on it. Since this was his first RV purchase, and he really knew nothing about them as some of our clients do, he went looking for an RV inspection service.
We happened to be in the area where the RV was located. So he contracted us to assist him with his pre-purchase evaluation.
Now, he was lucky that he found an RV that was owned by an original owner. And when an RV is of this age it is a good thing because you can get some better information about maintenance on the vehicle over its lifetime. In this case, the owner was meticulous and had a complete file of records for the motorized components. Even though that was the case we still advised our client, given the low mileage, to have the fluids analyzed at the lab. So we pulled samples of the oils and coolants and sent them off for review.
Given the age of the vehicle and that it spent time in the midwest and south-west, it was not in terrible condition as you can see from the photo above. It had the usual issues you would expect to see.
For the inspection, we met our client at an RV park where we had the RV brought to so it could have full services of water, sewer and electric. In order to do the most complete evaluation of the RV, we need full services so we can test all the systems.
We spent eight hours with the RV doing what a certified RV inspector does! After that physical evaluation was complete, the fluid samples were sent off to the lab, and our client was debriefed on the particulars of what we found, the next step was to generate a report that would detail the RV points of inspection that I listed above.
The final report was eighty-eight pages and listed a host of issues that the client needed to consider before purchasing the RV. This was the information he needed in order to figure out what he should pay for the RV given all the items that we identified that were in need of repair.
The funny thing for HMRVI Corporation is always how owners view their RV! The owner of this RV called it “Big Bubba.” She said directly to us that she would be surprised if we found anything wrong with it! Now, she was an extremely nice person and very willing to help us out, as well as the potential buyer, so he could get all the information he needed to decide whether or not he should make an offer on the RV.
In fact, we felt that he really liked her and felt sorry for her and the situation in which the RV was being sold. He really wanted to help her but on the other hand, we had to help him to step back and evaluate what she was asking for the RV by making sure he read and understood our RV inspection report thoroughly before he made a purchasing decision.
Here is a copy of the reports summary section, divided into sections of importance. It is thirteen pages of the report’s eighty-eight pages.
The owner of the RV was asking $35,000 for it. It was eighteen years old with some issues as you can see by the summary section of the RV inspection report. Our client kept asking us, “would you buy this RV?” Unfortunately, we can’t answer that question for him because our needs and wants in an RV will be completely different than his.
What we did give him though was all the information he needed to make an educated buying decision on his own with our assistance by providing him with what he needed to know about the RV and by coaching him to understand what the RV lifestyle is like and if this particular RV would meet his needs.
After receiving the finished report, the day after the inspection and the fluid reports a few days later, the client offered the owner $25,000 for the RV, and she excepted. It needed some work as you can see by the summary section of the report, but after our client had sent that information to an RV technician for a quote, that is how he arrived at his price.
So, he purchased the RV and was happy with his purchase. The RV inspection report saved him thousands, gave him the piece of mind in the buying process, and also helped him to better understand an RV as HMRVI Corporation spent the time with him so he would not feel completely lost once he ventured out in his home on wheels.
Let’s take a look at another story!
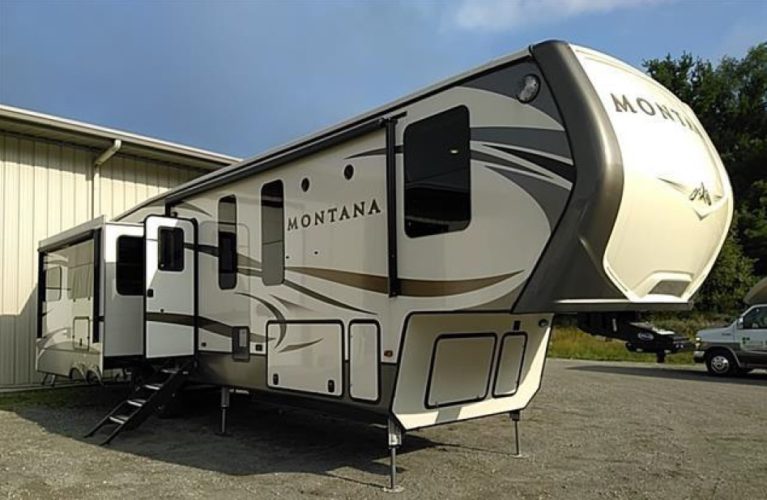
This new 5th wheel RV was located at a dealership and was purchased several months previous to us seeing it. The client was an out of state buyer and he was purchasing the RV to use as a second home while in the area where his work was.
Our client was also a new RVer and did not know the first thing about them, their systems, or how to live for extended periods of time in one. So, like any RV buyer who wants confidence in the RV purchase, he sought out assistance. We happened to be in the area where the RV was located so our client contracted us to assist him with evaluating this new RV before it left the dealership.
His concern was that the RV, being new, would have issues once it left the dealership and then he would have to bring it back and waste time in that process. He was not going to buy a truck to pull it but pay a company to move it 165 miles away from the dealership to the RV park where he was going to live in it two to three weeks out of the month.
The picture above is how we found the RV at the dealership. We began our inspection process which totaled six hours We worked through the points of inspection to evaluate the RV’s overall condition. Our client was not there the day of the inspection so when completed he was contacted so we could share with him what we found. Here is a list of the items that kept the RV at the dealership for another ten days after the inspection and before it left for its new location.
- The gray water tank valve that holds the water back, in its closed position, was leaking. Basically whatever was put into the tank poured right out. It looked like it was stuck in the open position. The problem with this was the blade seal is located in the underbelly that is sealed. So, a fair bit of work was needed to access and fix the problem.
- There were issues of missing sealant on the roof and the sidewalls. These are easy items to repair but if left unfound they would lead to water intrusion that over time would deteriorate the internal structure of the roof and sidewalls.
- There were issues with the entry door, missing window screens, and internal fans that were not working.
- The rear roof air conditioner unit, after being run for a few hours, had a chirping sound that was clearly audible while in the living room of the unit. It turned out that had to be replaced. They did not notice this when they purchased the RV.
- In the bunkroom of the RV, a loud squeak was observed while walking on the floor. The client was not happy with this one! They did not notice it when they purchased the RV. In order to correct the problem the gray tank underneath had to be removed to get to the floor structure above it to correct the problem – a fairly complicated job!
- There were about fifteen other minor issues that needed to be addressed before the RV left the dealership.
As I said, these issues kept the RV at the dealership for another ten days before it was ready to leave. The dealership was very accommodating and worked to correct all the issues that were found in the RV inspection.
A few days after the inspection we met the client at the dealership and spent time with them going through the RV and assisting them while they got the dealership walk-through. This took about forty-five minutes. Not nearly enough time to understand a new RV, especially when you have never owned one before! So, we spent a few more hours sharing about RV life and the RV’s systems and function.
How about this one!
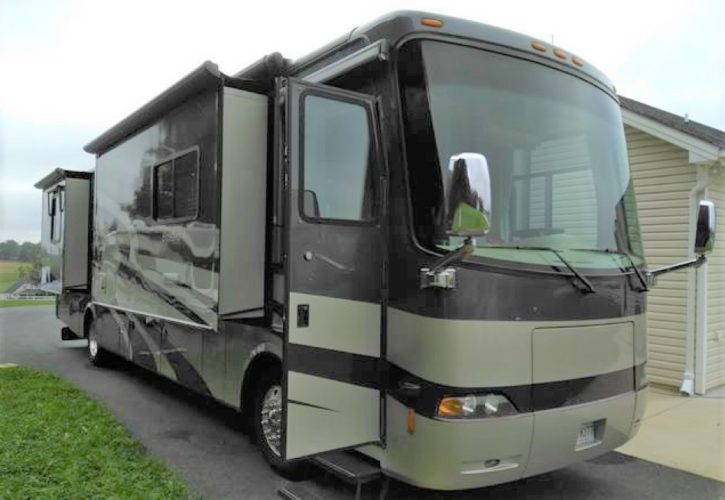
This RV was located out in the farm country of Maryland. We happened to be in the northeast and in close proximity to the RV. If we had not been there our client would not have had the opportunity to work with a certified RV inspector!
The owner of the RV had this unit parked at his home. He had all the services we needed to do a complete RV inspection for our client. Also, he was also the original owner of the RV.
This is another diesel pusher that had low mileage due to it going to Florida for the winter and returning to Maryland in the warmer season. At the time of the inspection, it had just shy of 37,000 miles on this eleven-year-old RV. Diesel engines are designed to be run and not to sit for long periods of time. Things deteriorate more quickly when they do. So, in this case, we recommended fluid samples be taken on the engine oil, transmission oil, and the engine coolant.
We spent eight hours with the RV checking all the items listed in the RV inspection points, the same as those listed at the start of this article. There were many life safety issues that were found in the leaking propane system, outdated detectors and fire extinguishers, non-working emergency exit windows, and areas where dangerous gases could enter the RV interior.
All the slideouts had issues with their operation. They did not deploy smoothly and exhibited lots of concerning noises during operation.
We had the chance to ask the owner about any recent repairs he had made. Once we are made aware of these things it is our job to verify if the repaired or replaced items appear to be as claimed. In this case, some were true and others things were not. Careful investigation revealed the inconsistencies with the claims made by the owner.
After client was in the area during the RV inspection, so at the completion of our evaluation we were able to spend time with him revealing what we found. The next day he had the inspection report to back up what we had discussed. A few days later the fluid reports came back from the lab.
What was the decision that was made for this RV purchase? Well, after trying to negotiate with the owner and his unwillingness to budge on the price, and after our client really digested the information from the inspection report, he decided to pass on purchasing the RV. He said that once he really had time to think about the RV from what he had read in the report and the work that was needed on the RV, he decided that he did not want that much of a project.
But the thing that really helped him make his decision was the RV inspection report. He told me that once he sat down and read the report again, a week after our inspection, that is what really helped him to decide!
We did hear back from him a few months later that he found another RV. He sent us a picture of his new home on wheels parked in his driveway. He did not have an inspection done on that one, but being an auto mechanic and handy guy, he felt he learned enough so that he could make the decision on his own. Plus, there was no certified RV inspector available to help him as we had left the area.
Are RV Inspections Necessary?
I think after reading these three stories you can answer that question for yourself. Without the kind of information that we were able to generate for our clients, they would have either made a mistake in their purchase or paid too much for the repairs that should have been covered by others.
So, whether the RV is new or used, the prospective buyer is experienced with RV’s or not, the RV is located nearby or at a distance, be sure to seek the assistance of an RV inspector before purchasing an RV! Would you buy a home without a home inspection? No! In fact, most mortgage companies require it.
If you would like to tackle a full-blown RV inspection on your own, check out my discussion at this link. If you are a do-it-yourself kind of person, you may have the skills to save time and money by following my advice! I have trained over 1,300 people to be RV inspectors since 2010.
Know This Before You Hire an NRVIA Inspector!
Before choosing an NRVIA inspector, be sure to interview them to discover their RV industry experience. I would suggest you search for an inspector with these qualifications:
- They themselves are an RVer with several years of experience living and traveling in an RV.
- For best results, two years of experience as an RV inspector or proof of knowledge base.
- For best results, twenty-five premium RV inspections are under their belt.
- For motor homes, delve deeply into their experience with them. Motor homes are much more complicated than towable RVs and require a higher level of experience inspecting them.
- Ask for a sample report for the class of RV that you are looking at.
Do You Want to Inspect the RV Yourself? I can help you!
To reach us for more information, or if you have questions, please contact us by clicking here!






4 comments
Skip to comment form
I have a question. We know, we need an rv inspection. We are currently looking at a 2015 5th wheel all the way in California. It is about the right age, the right floor plan and is set-up for solar. Price wise it is the same price as the same model in Houston (we live close to Waco, TX), but somebody has removed some of the furniture (fine by us we are not the biggest fans of the original furniture anyways). I think, it might be worth it to purchase a rv that far away considering the cost of 480 watt solar (3 panels), 2000 watt inverter, MPPT controller and two 6V 260Ah lead-acid batteries. I have found the closest NRVIA inspector is in Sacramento about 150 miles away form Santa Cruz. We have used another inspector in Texas and were very pleased. Are there any inspectors closer or is there another organization on the west coast???? Thank you !!!
Author
Thanks for stopping by our website Karoline! Your NRVIA certified RV inspector search sounds right. I would reach out to the individual in Sacremento and see if he is willing to travel. They usually are.
I would like imformation about RV inspection, prize: new or used..we are in southern California. Do you have certified RV inspector that we can contact?
Author
Hi Abner!
Thanks for stopping by our website! I will send you an email with information on how to check for an NRVIA inspector in your area.